
Prescriptions
Write a prescription with Bangladeshi medicine brands and 1+0+1 dosing, add tests and advice, set the follow-up date, sign and print it, and plan the next treatment.
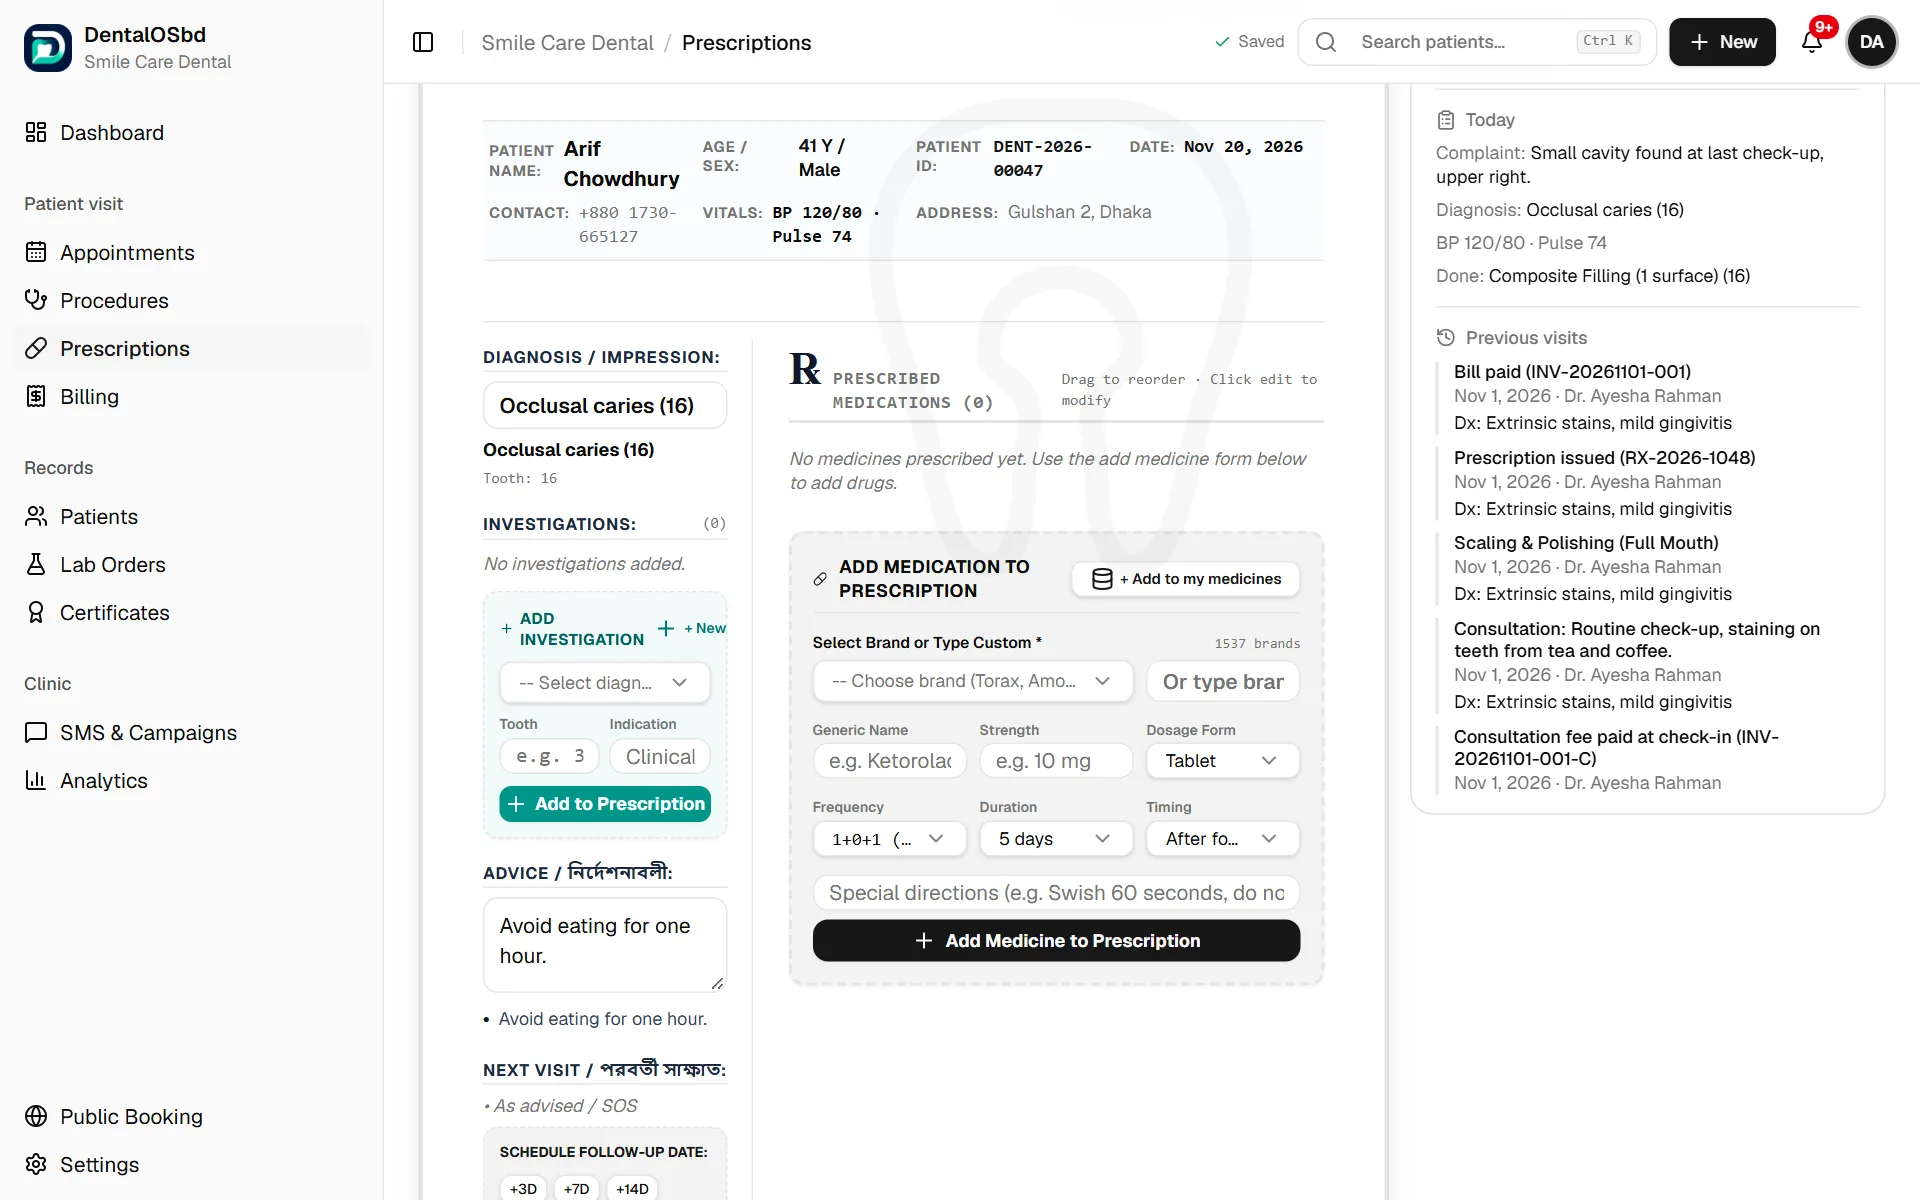
The prescription is written from the visit: the patient's details, vitals, diagnosis and tooth are already filled in from the notes. It prints on your clinic's letterhead with the doctor's degrees and BMDC number.
Choose the patient
At the top, Patient lists today's patients who have finished the notes (and the procedure, if they needed one). Pick the patient. If you came from the visit, they're already chosen.
Add medicines
- Under Add medication to prescription, start typing a brand in Select Brand or Type Custom. The list has more than 1,500 Bangladeshi brands. You can also type a medicine that isn't listed.
- The Generic Name, Strength and Dosage Form fill in. Check them.
- Choose the Frequency (for example 1+0+1 (Morning + Night)), the Duration (for example 5 days) and the Timing (Before food or After food).
- Click Add Medicine to Prescription.
- Repeat for each medicine. Drag medicines to change the order, or click edit to change one.
If a medicine clashes with an allergy on the patient's file, you'll see a warning.
Tip: Medicines you prescribe often with your own usual dose can be saved with + Add to my medicines, or in Settings → Medications. Only you see your own list.
Tests, advice and follow-up
- Investigations: pick a test or X-ray from your clinic's list, add the tooth and the reason, then click Add to Prescription.
- Advice: instructions for the patient, such as how to rinse or what to avoid.
- Next visit: click +3D, +7D, +14D or +1M to set the follow-up date, or pick a date.
Let the AI draft it (optional)
If your clinic has the AI Assistant and you have an AI seat, AI Pre-fill from Notes & Procedures drafts the medicines from the visit, in your brands and dosing, and explains why. Every medicine it suggests is marked Suggested by AI. Read and change each one before signing: the prescription is yours.
Plain A4 or your letterhead
Above the print buttons, Print on chooses the paper:
- Plain A4 prints the clinic's name, address, logo and the doctor's details at the top, on blank paper.
- Letterhead is for your own pre-printed pad. The header is left off, and the text keeps clear of the pad's printed top and bottom. Enter the Top and Bottom margins in millimetres: measure from the edge of the paper to just below the pad's header, and to just above its footer. The doctor's degrees and BMDC number print under the signature.
The choice and the margins are saved for the whole clinic, and certificates use the same setting.
A long prescription continues on a second page, with the same margins. A medicine is never split between two pages.
Tip: Print one prescription on a sheet of your pad and hold it up to the light. If the text touches the header or footer, increase the margin by a few millimetres.
Sign, print and move on
- Click Sign & Finalize. The prescription is saved to the patient's history. If you change something afterwards, sign it again with Re-sign.
- Print Clean prints it on the paper chosen under Print on. Download PDF saves a copy.
- Plan next treatment: add the treatments still to do, each with a tentative date. If the patient doesn't come back by then, a reminder is drafted for you to approve (see SMS & Campaigns).
- Proceed to Billing sends the patient to the front desk for payment.
Find an old prescription
Open the Past prescriptions tab and search by patient name, patient ID or phone number.
- View Full Sheet shows the prescription as it was issued.
- Load & Re-Prescribe copies its medicines into today's prescription, for a patient who needs the same again. Check the doses before signing.
How instructions print
Whether medicine instructions print in Bangla, English or both is set in Settings → Medications. For example: ১+০+১ — ৫ দিন (খাবারের পরে).
Still stuck?
Tell us what you were trying to do and what happened. A screenshot helps.